

Social media is an amazing tool to meet people, keep in touch with friends and connect with people all over the world. On the other hand, it can completely ruin secret places around the world by making them super popular and turning them into hotspots. But there are a few places that we’ve discovered thanks to social media. Havasupai is one of them – we’ve been saving pictures of Havasu & Beaver Falls for years, hoping one day we would get the chance to visit such a magical place. It has proved elusive because tourism is limited to avoid overcrowding – but we finally managed to snag a camping permit. This blog post is designed to help summarise everything we think you’ll need to know for your trip to one of the most beautiful places in the world!


Table of Contents
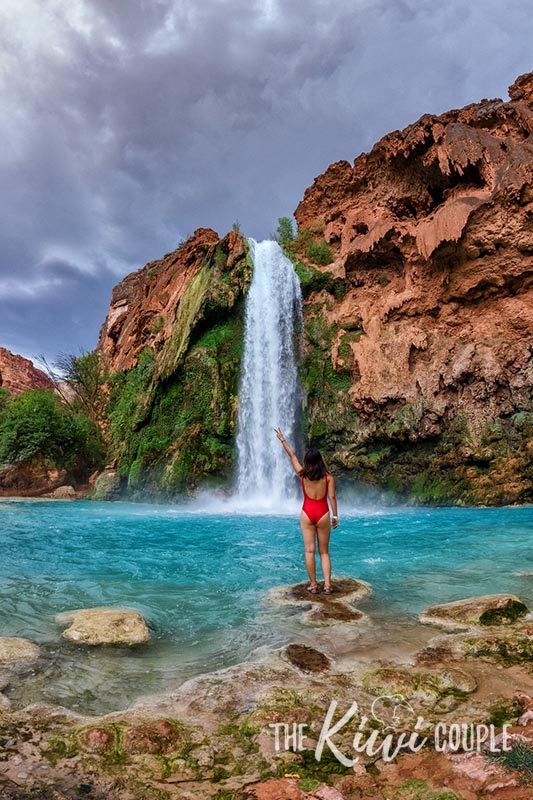
Havasupai – where is it, and why should you go?
Havasupai is located in Peach Springs, Arizona. To get there you have to either do a 10 mile hike down or hop on a helicopter. It’s an oasis in the middle of the desert – an area in the Grand Canyon that’s full of waterfalls and streams. The Havasupai Tribe own the land and run the permit systems, lodge and campground. If you’ve ever wanted to experience the beauty of the Grand Canyon from below, this won’t disappoint.

When is the best time to go to Havasupai?
This is up to you, and you can consider the different seasons depending on what you want from the trip. In the winter you will have much easier weather heat-wise to hike in and the campground will be really quiet. However, it may be a little too cold to swim and have potentially snowy trails. From June – August it’s monsoon season, so you run the risk of encountering a flash flood which can be really dangerous. We went in early September and loved it.

Getting a Camping Permit or Lodge Reservation
The Havasupai Tribe is in charge of the campground and lodge, and to visit you HAVE to get a reservation. There are no day hikes allowed – it’s 10 miles (16 km) each way with no access to water for most of the hike. The price seems to go up each year due to tourists leaving their trash in the canyon (so if you go, leave no trace!) – in 2019 we paid $100/pp/pn, and you had to book 3 nights. Since 2019, the process for getting a camping permit is through the tribe’s website. All camping permits for the entire year go on sale at once on a date that the tribe announces closer to the time. It’s usually Feb 1st, 8am Arizona time or a date close to that. The demand is overwhelming, and the website can crash. These are our top tips for getting a permit:
- Make sure you and everyone in your party have an account in advance WITH payment information added.
- Choose your dates beforehand and have a range of different dates that will work in case your first choice isn’t available.
- Everybody needs to try to snag a permit for your preferred dates.
- Log on a little before the time to be prepared.
- Do NOT try and be logged onto two different devices (ie. your phone and your laptop) – it WILL NOT WORK.
- If you are having issues, try another browser!
The great news is that the tribe has created a ‘transfer system’ as of 2019. This means that people can on-sell their permits if they can’t go anymore, so even if you missed out originally you can keep an eye on the transfer page and grab one when they come up.
We didn’t stay at the Lodge, but it’s much more expensive. The only way to book the Lodge is to call, and reservations open June 1st, 8am AZ time for the following year. From what we’ve read online, there are only 2 phone lines, so they’re often engaged – you just need to persist and hopefully you get through!

Resources to help you plan
Once you’ve got the permit you’ll be into full planning mode. It’s not a trip you can do spontaneously, to be safe you need to put some preparation in. The best ways to plan for this trip is to read blogs (hello!) and join Facebook discussion groups full of people who have done the trip (some many times) or are about to do it. You can find them here: Havadiscussion and Havasupai and Havasu Falls. It’s also a fun place to read about other people’s experiences, keep an eye on weather warnings and anything else that might come up.

What should be in your backpack?
The number one thing that we read online before going was that people just wished that they had packed less. It gets TIRING carrying heavy packs on your back in the desert heat for 10 miles. The number one thing you can’t skimp on is water, because if you don’t have enough it can get dangerous.

Below is what we took with us, and we’ve put an Asterix next to what we’d leave home next time.
- 3L water bladder, life straw filter, collapsible water jug, 2x 1L water bottles, 2x 500ml water bottles (with electrolytes)
- First aid kit, blister plasters, moleskin, foot glide (to prevent blisters)
- Camp stove & fuel, pot, cutlery, lighter
- 2x rat sacks, 2x odour-proof bags
- 3-man tent, hammock, sleeping bag*, 2x sleeping mats, 2x blow up pillows
- 2x head lamps, 1x torch*
- 10L dry bag, 3L dry bag
- Bike gloves
- Toiletries
- 2x microfibre towels
- Clothing each: 2x socks, 2x underwear, 1x t-shirt, 1x dress (Rachel only!), swimsuits, waterproof trousers, 2x ponchos, 1x thermal set, 1x sarong
- Paracord, multi-tool, duct tape, plastic bags, snap lock bags
- 1x big battery pack, 1x small battery pack*
- 2x sets hiking poles* (Jeremy wouldn’t bring his, Rachel would bring hers)
- Kindle
- 2x water sandals
- EOS R with 17-40mm lens, 2x spare batteries and an ND filter
- Tripod
- DJI Osmo Action
- Lumix ZS100*
- Food: 4x freeze dried meals (3 dinners, 1 lunch), 2x oatmeal cups (1 breakfast), 10x cliff bars (2x breakfasts, 2x lunches, hike out snacks), 8x packets of trail mix* (too many, should have brought 4x), 3x electrolyte sachets, 2x packets of almonds, 1x packet of moon cheese*, 6x kind bars, handful of Werther’s Original candy
You can get away with not bringing a water filter as the fern spring at the campground is cool and delicious. If you do bring one though, you have access to water wherever you’re by a stream – so on day hikes to Beaver Falls etc, you don’t need to bring as much water with you. We definitely packed more than we needed and didn’t touch some things (e.g. the first aid kit, waterproof clothes), but we’d still bring them for cases of emergency.

How to get to Havasupai
There are two hotels near the Havasupai trailhead – and by near, we mean within 1-2 hours drive. The closest one is Hualapai Lodge in Peach Springs. There is a train that runs past all night, so they offer ear plugs for all their guests. We stayed here and really enjoyed it. We also got our gear shipped here from a rental company, and stored valuables in a rented locker while we were on our hike – making it extra simple for us! The other option that people really love is Grand Canyon Caverns Inn. It’s a little bit further away which is why we didn’t choose it, but we drove past and it looked pretty awesome.
Some people drive to the trailhead the night before and sleep in their cars before doing the hike, which is definitely an option. For us, we needed a place to sort our packs, have a shower and a real bed before heading down to Havasupai.
Once you get to the trailhead there are some options for you. The most obvious way down is to hike the 10 miles into the canyon with your packs. You can also pre-book a mule to take down your pack for you, but we would feel too bad for the animals. Apparently they are treated better nowadays, but we didn’t want to take that risk. Alternatively, you can take a helicopter down to Supai and hike the 2 miles from there to the campground. It only costs $70 one way, but the one catch is that the helicopter service is for the locals, so you can’t be sure what time you’ll actually get on a helicopter.
If you’re hiking down, you should aim to leave before sunrise so you can avoid the desert heat. We set off at about 0520am, and encountered our first people hiking the opposite way pretty quickly! You won’t be alone as lots of people do the same thing, just make sure you have a good headlamp.
When you reach the village of Supai, you have to check-in to receive your wristbands and camping tag. From there, you can stop at the grocery store (if it’s open) to grab a Gatorade, or just continue to the campsite – just 2 more miles!

Setting up your campsite
When you arrive to the campground your first instinct is to grab any campsite you see, to get rid of your packs and relieve your sore shoulders. But as you’ll soon find – the best campsites are further through, so try and make it at least to the middle bathrooms. The campsites around there are so much prettier – right by the water and lots of them have less foot traffic! Then you can set up your perfect Hava-home.
Depending on what season you go, the critters in the campground can be especially hungry. During summer, the squirrels and racoons are huge nuisances – they will do anything they can to steal your food. There are plastic buckets all around the campground for you to use to protect your food. We also used a rat sack inside the plastic buckets, sealed them with a lid and placed heavy rocks on top. We used two buckets, so that if one of them was compromised we’d still have food. You can also hang your buckets or rat sacks directly onto paracord on the trees. Don’t hang rat sacks directly below branches that squirrels can jump onto!

What’s the best Havasupai itinerary?
This is what we believe is the best Havasupai itinerary – but it could change depending on your weather or if you have a particular waterfall that you love!
Day 1: Hike down early – make sure you start before sunrise. Set up camp and spend the afternoon at Havasu Falls
Day 2: Get up early (around 0600) and head to Beaver Falls, stopping at Mooney Falls on the way. Use bike gloves or some sort of gloves for the hike down to Mooney Falls – the chains can get slippery and it’s pretty steep. By leaving early you’ll avoid crowds and can have lunch at Beaver Falls. If you are going to hike to the Confluence it would be best to do it on this day as well.
Day 3: Take it a little easier and sleep in a bit. Head to Little Navajo Falls and Fifty Foot Falls, stop at the fry bread hut for lunch if it’s open and re-visit Havasu Falls. Spend the late afternoon packing up camp to make it easier for the hike out.
Day 4: Get up really early, around 0100-0200 to pack out and start the hike by 0230 in summer. You want to make it to the final switchbacks before there’s direct sunlight on it – which would be torture.


What we wish we did differently
Overall, we were really happy with our trip and it completely lived up to our expectations. That first glimpse of Havasu Falls makes everything worth it! Next time though – we would rather have two hammocks, with bug nets and a rain fly than lugging down a tent. It’s a little harder because we were doing it as part of a bigger trip, so had to rent all our gear in advance. If we go again, we’d happily buy a bug net and rain fly to take it all down with us! We slept much better when we had naps in Jeremy’s hammock than in the tent. We’d also take a little less food, as we ended up having to eat a bunch on our last day as we didn’t want to pack it out.

So that’s what we think you need to know for your trip to Havasupai! We did it without any training (Rachel could have done with a little – her calves were TIGHT after hiking with a pack) but survived. It was such a cool experience, and we hope we get to do it again one day.
I camped here for a trip 20 years ago. So great to see it all again through your photos.
Thanks Karen! Is it very different to how it was back then? I’ve heard that the waterfall has changed quite a bit!
Such stunning photos. Thanks for such a detailed post and especially the things you would do differently. It looks like an absolutely amazing hike.
Thanks so much Lisa, you’re very welcome. We hope that the post can help if you’re thinking of planning a trip! We’d do it again in a heartbeat.
This is a dream of mine! Thanks for posting your guide and sharing the photos. – Alex https://alexcerball.com/
We hope you get there soon! It’s really so incredible. Thanks for checking us out, Alex!